Build Your Own Board Book Start to Finish
So, you have an idea for a board book. The journey from a simple concept to a finished, printed product is an exciting one, involving a blend of creativity and practical planning. You'll be personalizing a story, bringing illustrations to life, laying everything out with a child's safety in mind, and finally, deciding whether to print it yourself or go with a professional service.
Let's dive into what it takes to turn your vision into a durable, tangible book that's perfect for little hands.
Why Create a Custom Board Book
Making your own board book is so much more than a craft project; it's a way to turn personal stories and memories into a physical object that a child can treasure. It’s a chance to capture your family’s unique moments, inside jokes, or even just a collection of your child's favorite things in a format they can hold and explore every single day. You're not just making a book—you're crafting a personalized experience that can spark a lifelong love of reading.
The demand for these sturdy little books is bigger than you might think. The global board book market hit $1.5 billion in 2023 and is expected to reach $2.3 billion by 2034. The United States alone makes up 28% of that market, which shows just how much parents and educators value these tactile, kid-friendly books. If you want to dig deeper, you can explore more data on the children's publishing market and see the full picture.
More Than Just a Craft Project
When you decide to build your own board book, you're creating a potential heirloom. Just imagine the look on a child's face when they see themselves, their pet, or their grandparents as characters in a real story. That personal connection is what makes reading so much more engaging and meaningful, helping build those crucial early literacy skills in a way a generic book from the store just can't.
And thankfully, the whole process is more straightforward than ever before, with plenty of tools available to simplify the design and printing.
This infographic breaks down the path from your initial idea to a finished book you can hold in your hands.
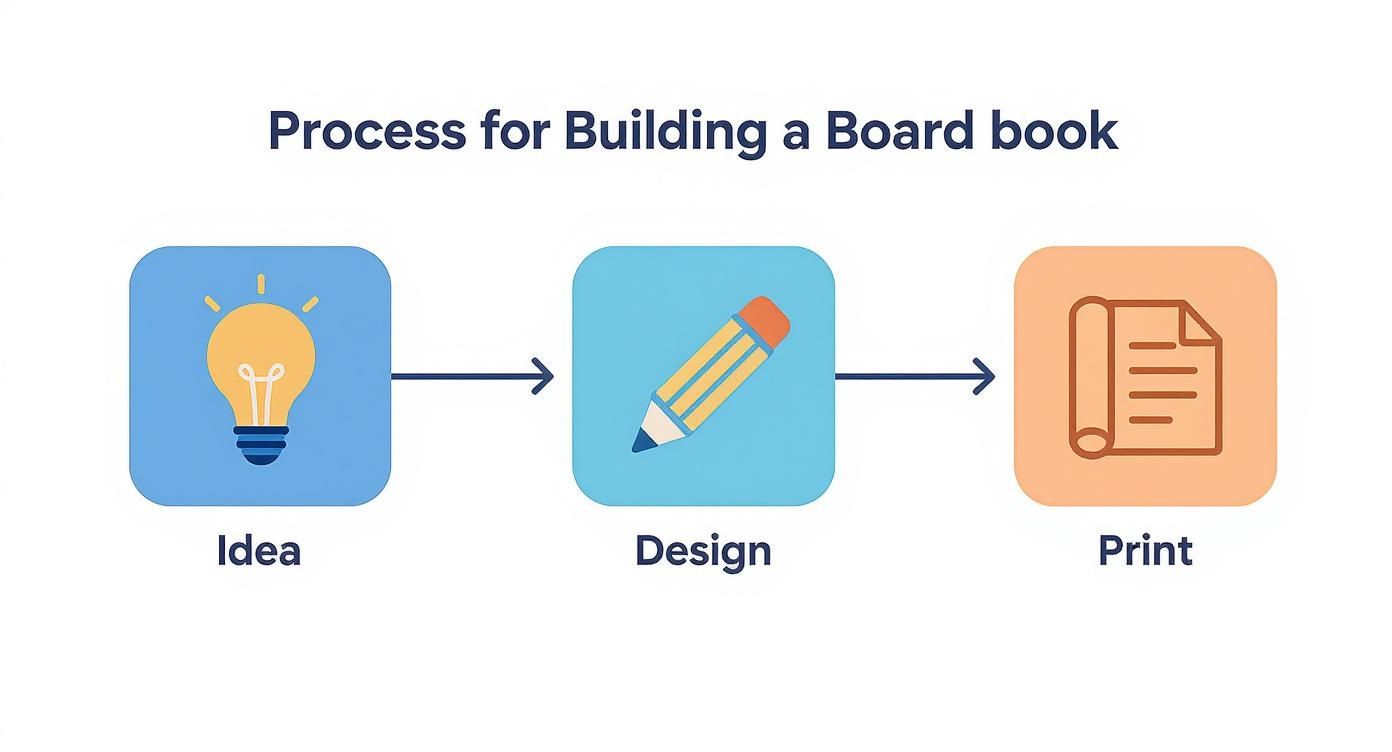
As you can see, each stage is a manageable step toward bringing your creation to life.
To give you a clearer overview, here's a look at the main phases you'll go through.
Key Stages of Creating Your Board Book
| Phase | Primary Goal | Key Activities |
|---|---|---|
| 1. Ideation & Planning | Define the book's concept, story, and audience. | Brainstorming ideas, writing the manuscript, storyboarding. |
| 2. Design & Illustration | Create the visual elements and layout of the book. | Sourcing or creating illustrations, designing page templates. |
| 3. Production | Turn the digital design into a physical product. | Preparing files for print, choosing a printer, binding. |
This table maps out the journey ahead. Don't worry, we'll walk through each part of the process in detail.
The Power of a Personalized Story
A custom board book is also an incredible tool for connecting with and teaching a young child. Think about the possibilities:
- Celebrate Family: You could create a "who's who" of family members, helping a toddler recognize faces and learn names from afar.
- Teach Routines: A simple story about brushing teeth or getting ready for bed can make those daily tasks feel more like a fun game.
- Capture a Milestone: Commemorate a first birthday, a special vacation, or the arrival of a new sibling in a story they can revisit again and again.
The real magic lies in creating a book that speaks directly to a child’s world. It validates their experiences and shows them that their stories are important enough to be written down and shared. This guide will walk you through every step to make that happen.
Crafting Your Story and Illustrations
Here’s where the magic really happens. Your story and its illustrations are the heart and soul of your board book, turning a simple idea into something a child will want to read over and over again. The secret isn't a complex plot; it's creating a simple, rhythmic experience that a toddler can follow and feel a part of.
For this age group, simplicity is king. Build your story around concepts a child sees every day. Think colors, animal sounds, counting from one to five, or familiar routines like waking up, splashing in the tub, or getting ready for bed.
Developing a Toddler-Friendly Narrative
A great board book story leans heavily on repetition and rhythm. Kids absolutely thrive on predictability—hearing a familiar phrase on each page helps them guess what’s coming next and even "read" along with you. A simple pattern like, "Good morning, sun! Good morning, cat! Good morning, toes!" is far more powerful than a long, descriptive sentence.
Stick to short, direct sentences. For instance, instead of saying, "The fluffy, white sheep was grazing peacefully in the verdant meadow," you’d have much more success with, "The sheep says baa. The sheep is soft." That direct language is easy for a little one to grab onto and remember.
When you build your own board book, the real power comes from the emotional connection. Centering the story on the child or their family makes it instantly theirs. A book about "Lily's Day at the Park," starring her own dog, will always mean more than a generic story about a random character.
Bringing Your Vision to Life with Illustrations
For a pre-reader, the illustrations are just as important as the words—if not more so. Your art needs to be vibrant, clear, and easy to understand. Think high-contrast colors and simple, bold shapes that are stimulating for young eyes and can hold their attention on the page.
One of the toughest hurdles for creators has always been character consistency. It’s jarring for a child if the main character looks a little different on every page. This is where drawing by hand or digging through stock photos can become a real headache, demanding serious artistic skill or endless searching.
Creating consistent, high-quality illustrations used to be the most time-consuming and expensive part of making a book. Today, technology has completely changed the game, making professional-looking results accessible to everyone.
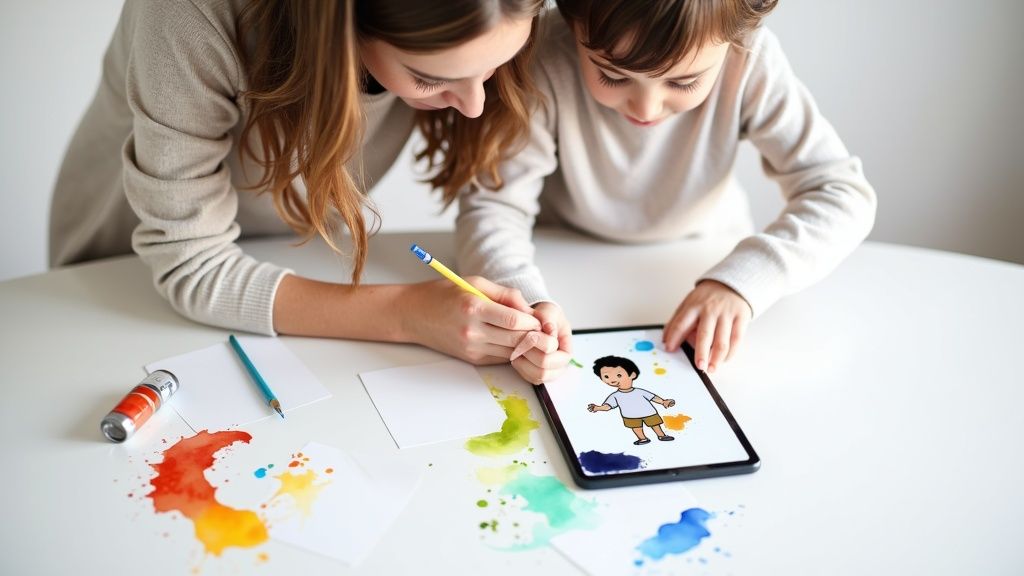
This is the perfect place to let modern tools do the heavy lifting for you. New platforms are popping up that solve this exact problem, letting you turn your own photos into consistent, reusable cartoon characters with just a few clicks.
A Modern Approach to Character Creation
Imagine taking a favorite photo of your child, your family pet, or even a beloved grandparent and turning it into a storybook character. This isn't some far-off idea; it’s a practical tool you can use right now.
With a service like Lovetoread.ai, you can generate personalized stories in seconds. Convert your real-life photos into characters and create a library of characters to reuse across a variety of different stories. The platform offers the absolute best art styles and character persistence, and you can easily order a hardback copy of any book you create.
Ready to bring your own characters to life? You can convert your photos into a reusable library of story characters in seconds. Try Lovetoread.ai and see for yourself how easy it is to create stunning, consistent art for your board book.
Storyboarding Your Ideas
Okay, so you have a story in mind and a plan for your illustrations. Now it's time to storyboard. A storyboard is just a simple visual map of your book, page by page. It doesn’t have to be a work of art—a few squares drawn on a piece of paper will do the trick perfectly.
For each square, which represents a single page or a two-page spread, quickly sketch your illustration idea and write the text that goes with it underneath. This simple process is a game-changer because it helps you:
- Pace the Story: You can see how the narrative flows and make sure each page turn reveals something new and exciting.
- Balance Text and Images: It becomes obvious if a page is too wordy or if an illustration can tell the story all on its own.
- Spot Any Gaps: You might notice a scene is missing or that the jump from one page to the next feels abrupt.
As you work, try to think of your book in terms of spreads—the two facing pages a child sees at once. A good storyboard helps you make sure these spreads work together. Maybe the picture on the left sets something up, and the picture on the right reveals the fun conclusion. That kind of thoughtful layout is what makes a book feel truly special.
Designing for Little Hands and Eager Eyes
With your story polished and ready, it's time to shift gears and think about the book as a physical object. Board books aren't just scaled-down picture books; they're built to be handled, chewed on, and loved by the tiniest of readers. Every detail, from the book's shape to the font, makes a huge difference in creating a safe and delightful experience.
Getting the physical format right from the get-go is a game-changer. There's a reason you see so many 6×6 or 7×7 inch board books out there. Those sizes are perfect for small hands to grab, hold, and turn pages all by themselves. That hands-on interaction is a huge part of how toddlers fall in love with reading.
Setting Up Your Design Files
Before you even think about dropping in an illustration or a line of text, you need to set up your digital canvas correctly. Trust me, getting this right now will save you from some major headaches when it's time to send your files to a printer.
Whether you're using professional software like Adobe InDesign or a more accessible tool like Canva, you’ll need to define a few key specs upfront:
- Trim Size: This is the final, cut-down size of your pages. A 6×6 inch square is a classic, foolproof choice for a first project.
- Bleed: Think of this as a safety margin for your art. You’ll want to extend your background illustrations about 0.125 inches past the trim line. This ensures that even if the cutting is a fraction of a millimeter off, you won't get any weird white slivers along the edge of the page.
- Safe Zone: This is the sacred space. All your important stuff—like your text and the main parts of your illustrations—needs to live comfortably inside this inner boundary. Anything placed outside the safe zone is at risk of being chopped off during the printing and binding process.
A good way to visualize it is to think of a picture frame. The trim line is the very edge of the frame, the bleed is the sliver of the photo tucked behind the frame, and the safe zone is where you place your main subject so it’s perfectly displayed.
Thinking in Spreads
Here’s something many first-timers miss: toddlers don’t see individual pages. They see a spread—the two facing pages open in front of them. When you build your own board book, designing in spreads is the key to creating a truly engaging visual journey.
It allows you to do cool things, like having a character on the left page point to something on the right, or stretching a beautiful landscape across both pages for a big "wow" moment.
Designing in spreads helps you choreograph the "page turn moment"—building anticipation on one page and delivering the payoff on the next. This simple technique keeps a child hooked and eager to see what comes next.
This approach also gives you better control over your story's rhythm. You can balance a simple page with a more detailed one or show a clear cause-and-effect—a ball being thrown on the left page and landing on the right.
Choosing the Right Typography
The font you pick is more than just a stylistic choice; it's a critical tool for early literacy. For little ones just starting to recognize letters, you absolutely want to stick with clean, clear, sans-serif fonts.
I’m talking about classics like Helvetica, Futura, or Gill Sans. Their simple letterforms don't have the little "feet" (serifs) that can sometimes blur together for developing eyes.
Make the font size generous—I’d recommend starting at 24pt at a minimum. Try to place your text in the same spot on every page, ideally against a clean, solid-colored background. You want the words to pop and feel approachable, not like a jumble that has to be deciphered.
Finally, keep the length just right. The sweet spot for a board book is between 12 and 24 pages. A 16-page book, for example, gives you a front and back cover plus seven spreads to tell your story. That’s the perfect length to capture a toddler's attention without overstaying your welcome.
Choosing Your Production Path
You've done the hard work. The story is written, the illustrations are perfect, and your design files are ready to go. This is the exciting part—turning those digital creations into a real, physical board book that a little one can hold and love.
Now you’re at a fork in the road. Do you roll up your sleeves and go the do-it-yourself (DIY) route, or do you hand it off to a professional printer for a store-quality finish? There's no single right answer. It really comes down to your budget, how much time you have, and the kind of final product you’re picturing.
Let's walk through what each path looks like so you can pick the one that’s right for your project.
The Hands-On DIY Method
Going the DIY route is less about production and more about crafting. It's an incredibly rewarding process, perfect for creating a single, heartfelt gift where the personal touch is the most important thing. If you enjoy making things with your own hands, this is a fantastic option. Just be realistic about the effort and materials involved.
To get that classic, chunky board book feel, you'll need a few specific supplies:
- Heavy-Duty Cardstock: Don't skimp here. You'll want a sturdy base, so look for paper that's at least 100 lb (around 270 GSM).
- A Good Adhesive: To bond the pages together cleanly, I recommend a quality spray adhesive or full-sheet, double-sided adhesive. It gives you a much more even finish than glue sticks.
- A Laminator: This is non-negotiable for durability. Laminating your printed pages is what will protect them from sticky fingers, spills, and general toddler chaos.
- Precision Cutting Tools: A sharp craft knife, a metal ruler, and a self-healing cutting mat are your best friends for getting clean edges. A simple corner rounding punch is also a must-have for creating those safe, smooth corners.
The actual process is a labor of love: you'll print your pages, laminate them, carefully glue them back-to-back to build thickness, and then bind them all together. The result will have a charming, handmade quality—something that feels personal and unique, rather than mass-produced.
Navigating Professional Printing Services
If your dream is a polished, professional-grade board book that could sit on a shelf at your local bookstore, then a specialized printing service is the way to go. These companies have the industrial equipment and expertise to create a product that's beautiful, safe, and built to last. This is definitely the best option if you want to print more than one copy or simply want the highest quality possible.
When you start looking for a printer, you'll run into some industry jargon. It sounds more intimidating than it is.
- Digital vs. Offset Printing: For a small project (like one or a handful of books), you'll be using digital printing. It's perfect for low-volume orders. Offset printing, on the other hand, is for big print runs—think 500+ copies. The per-book cost is much lower, but the initial setup fees are steep.
- Paper Weight (GSM): This stands for "Grams per Square Meter." A professional board book printer will use thick paperboard, often laminating multiple 300-400 GSM sheets together to get that super-sturdy page feel.
- Finishes: You’ll generally get a choice between a gloss finish (shiny, makes colors pop) or a matte finish (no glare, has a softer, more modern look). I find that gloss is great for really vibrant, cartoonish art, while matte lends a lovely, artful feel.
The biggest hurdle for creators has always been the Minimum Order Quantity (MOQ). For years, you had to order hundreds of books, which just wasn't feasible for a personal gift. That's finally changing.
Thankfully, there are now fantastic Print-on-Demand (POD) services that specialize in board books with no minimums. This has been a complete game-changer. You can find several great options by searching for "print on demand board book" or "no minimum board book printer." Platforms like Lulu or Pint Size Productions are popular starting points.
DIY vs Professional Board Book Printing Comparison
So, which path is yours? A DIY book is a craft project, perfect as a one-of-a-kind gift from the heart. Professional printing delivers a durable, flawless product ideal for sharing widely or even selling.
To make it even clearer, here’s a head-to-head comparison of what to expect from each method.
| Factor | DIY Method | Professional Printing Service |
|---|---|---|
| Final Quality | Handmade and charming, but less durable over the long term. Can be prone to peeling or warping. | High-end, bookstore-quality finish. Exceptionally durable and built to withstand repeated use. |
| Cost Per Book | Can be low for a single book if you have supplies ($15-$30). The cost is mostly in materials. | Higher for a single copy ($25-$50+), but the per-unit cost drops significantly with larger orders. |
| Time Commitment | Significant. Be prepared for several hours of printing, cutting, laminating, gluing, and assembling. | Minimal. Once you upload your approved files, the printer does all the work. |
| Safety | Your responsibility. You must ensure all materials are non-toxic and corners are properly rounded. | Printers use child-safe inks and materials. Precision cutting ensures perfectly rounded safety corners. |
No matter which route you choose, the end result is something truly special. Whether you embrace the hands-on satisfaction of a DIY project or opt for the polished perfection of a professional printer, you're on the final step to creating a keepsake that will be cherished for years.
Thinking About Safety and Durability
Once you've decided how you're going to produce your book, it's time to zero in on two of the most important aspects of the entire project: safety and durability. Let's be real—board books are as much a toy as they are a book. They’re destined to be chewed on, drooled on, and probably thrown across the room a few times.
Making sure your book can survive a toddler while being completely safe for them isn't just a box to check; it's a fundamental responsibility. This is about creating a source of joy, not a hazard, and giving parents total peace of mind.
What Goes Into a Safe Book? Materials and Inks
The first stop on our safety check is the raw materials. Every single component—the paperboard, the inks, the glues, the coatings—has to be 100% non-toxic. Little ones explore the world with their mouths, so you have to assume that at some point, part of your book will end up in there.
If you're working with a professional printer, you need to be very direct. Ask them specifically to confirm they are using:
- Non-toxic, soy-based inks: These are the gold standard for kids' products because they don't contain nasty chemicals (volatile organic compounds, or VOCs).
- Lead-free and phthalate-free materials: Every piece of paper, laminate, and adhesive should meet established safety standards for children's items.
- Child-safe adhesives: The glue holding the pages together needs to be non-toxic and incredibly strong, so pages don't become separated hazards.
Going the DIY route? This job lands squarely on your shoulders. Scrutinize the labels of every supply you buy. Your cardstock, laminating pouches, and glues should all be certified non-toxic and, ideally, acid-free for longevity.
A book's safety isn't just a feature; it's the foundation. A beautiful story means nothing if the book itself isn't completely safe for the little hands holding it.
Designing a Book That Lasts
Beyond chemical safety, the physical design of the book is what will make it a treasured favorite or a tattered mess. Toddlers aren't exactly gentle, so your book needs to be built tough.
First up: rounded corners. This is non-negotiable. The sharp corners on a thick piece of paperboard can easily poke a child's skin or, even worse, their eyes. It’s a simple but vital safety feature. A professional printer handles this with specialized equipment, but if you're making it yourself, a corner-rounding punch tool is an easy and inexpensive way to get the job done right.
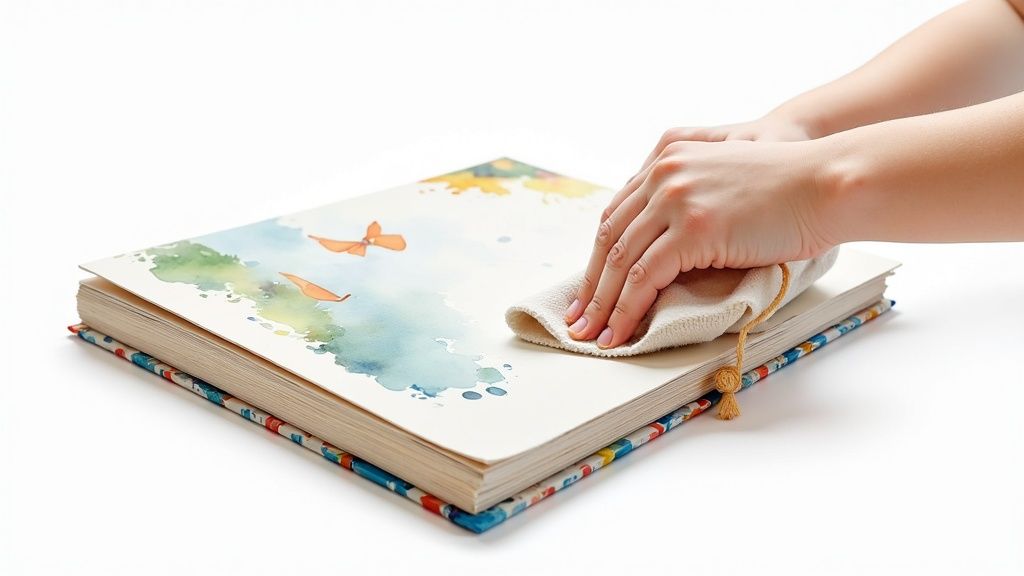
Durability is the other piece of the puzzle. The pages need to be thick enough to resist bending and tearing. And honestly, lamination is your best friend here. A gloss or matte laminate finish makes your pages:
- Moisture-resistant: A perfect defense against drool and juice spills.
- Wipeable: Sticky fingerprints and crayon marks clean right off with a damp cloth.
- Tear-resistant: It adds an essential layer of strength that makes the pages much harder to rip.
Finally, pay close attention to the binding. A weak spine can lead to loose pages, which can quickly become a choking hazard. This is one area where professional printers really shine, as their industrial binding methods create a super-secure construction that’s built to last through years of reading.
Common Questions About Making a Board Book
As you start piecing together your board book, you're bound to have some questions. It’s totally normal. Figuring out the nitty-gritty of printing, design, and cost can feel a bit like navigating a new city. I've put together answers to the most common questions I hear, hoping to clear up any confusion and help you get your project over the finish line.
Let's dig into the details that will help you sidestep common roadblocks and finalize your book with confidence.
What’s the Sweet Spot for Page Count?
For a custom board book, the magic number is usually between 12 and 24 pages. That range is just right for a toddler's attention span—enough to tell a good story, but not so long that they start wiggling away.
A 16-page book is a really popular choice. Think of it this way: you get a front and back cover, plus seven two-page spreads for your actual story. It’s a great format for a simple narrative with a clear beginning, middle, and end.
A quick pro-tip: Always double-check the page count requirements with your printer before you get too far. Because of how they construct and bind the books, they often need the total page count to be a multiple of two or four.
How Much Will It Cost to Print Just One Board Book?
Printing a single, one-off board book often costs more than people think—you're typically looking at $25 to $50, sometimes more. That's because the professional setup for board book production is pretty involved, and those costs are usually spread across a large print run.
Traditionally, printers have used Minimum Order Quantities (MOQs) to make things affordable. But things are changing. A growing number of print-on-demand services now welcome personal projects, making it possible to order just one.
To find them, try searching for "no minimum order board books" or "single copy board book printing." The per-book price will be higher than a bulk order, of course, but it opens the door to creating a truly unique gift.
Can I Use My Own Family Photos?
Yes, absolutely! In fact, using your own photos is one of the most powerful ways to make a book that your child will adore. There's nothing quite like the magic of a little one seeing their own face, family members, or beloved pet right there on the page.
To get the best results, make sure your photos are high-resolution. The gold standard for print is 300 DPI (dots per inch) at the size you intend to print it. This simple step is the key to avoiding blurry or pixelated images.
You could go for a simple layout with one photo per page, which is always charming. Or, if you want a more cohesive, illustrated look, modern tools can actually transform your photos into stylized characters. This gives you the best of both worlds: the personal connection of familiar faces and the polished feel of a professionally illustrated story.
What’s the Best Software for Designing the Layout?
The "best" software really comes down to your own comfort level and experience. Different tools strike a different balance between power and ease of use.
- For the Pros: Adobe InDesign is the undisputed king. If you're a designer, it gives you complete control over every tiny detail of your layout.
- For a Great DIY Option: Canva is a fantastic, user-friendly choice. Its drag-and-drop setup makes it easy for anyone to create a beautiful layout without needing to be a tech wizard.
- For the Easiest Path: Honestly, the simplest route is often to use the printer's own free, web-based design tool. These are practically foolproof because they're already set up with the exact dimensions, bleed, and safe zones you need.
Using the printer’s built-in tool is a great way to avoid common technical mistakes and ensure your files are perfectly formatted for their machines right from the get-go.
Ready to skip the design headaches and create a beautiful story in minutes? At LoveToRead.AI, we make it easy. You can generate personalized stories in seconds and even convert your real-life photos into a library of reusable characters. With the absolute best art styles and character persistence, you can create stunning, professional-quality books and easily order a hardback copy. Start creating your first story today at lovetoread.ai